
In this blog, let’s deep dive into how containers work within the Linux ecosystem and build a simple container runtime from scratch that mimics how containers operate.
Containers from the lens of linux. #
At their core, containers are simply sets of isolated Linux processes.
Containers leverage several key Linux kernel features:
-
Namespaces : Isolate what a process can see, such as process IDs (PID), mount points, network interfaces, UTS (hostname), IPC, user IDs, and (on newer kernels) cgroup namespaces.
-
cgroups v2 : Control and limit what resources a process can consume — including CPU, memory, process IDs, and I/O bandwidth.
-
Capabilities : Provide fine-grained privileges to processes without granting full root access, e.g., allowing network administration with CAP_NET_ADMIN.
-
Filesystem isolation : Run processes in a minimal root filesystem (rootfs) isolated from the host, using techniques like chroot or pivot_root.
-
Seccomp/AppArmor/SELinux : Optional security layers that sandbox syscalls and enforce security policies.
Key Linux Syscalls Used By Containers #
- clone()
- Creates a new process with specific namespace isolation.
- This creates a new process isolated in new mount, PID, and network namespaces.
Example:
clone(childFunc, childStack, CLONE_NEWNS | CLONE_NEWPID | CLONE_NEWNET | SIGCHLD, arg);
- unshare()
- Detach the calling process from certain namespaces, putting it into new namespaces without creating a new process.
- This makes the current process run in new mount and network namespaces.
Example:
unshare(CLONE_NEWNS | CLONE_NEWNET);
- mount() and umount2()
- Mount or unmount filesystems.
- Used to create an isolated root filesystem for containers by mounting the container’s rootfs, bind mounting necessary directories (e.g., /proc), and setting up overlay filesystems.
Example:
mount("rootfs", "/", NULL, MS_BIND | MS_REC, NULL);
- pivot_root()
- Change the root filesystem of the current process.
- Used to switch the root filesystem to the container’s rootfs, making the container’s filesystem appear as / inside the container.
Example:
pivot_root(new_root, put_old);
- chroot()
- Change the root directory of the current process.
Example:
chroot("/path/to/rootfs");
- setgroups(), setuid(), setgid()
- Set group and user IDs.
- Essential for user namespace isolation and privilege dropping inside containers.
- capset()
- Set the capabilities for the process.
- Used to drop unnecessary privileges, giving fine-grained control over process capabilities.
Build a Container from Scratch #
With a basic understanding of how containers work and how they interact with the Linux kernel, let’s now build a minimal container from scratch and explore how it actually works under the hood.
By the end of this blog, you’ll have built:
- A minimal rootful container using unshare and chroot
- A rootless container where UID 0 inside the container maps to an unprivileged UID on the host
Tested on Ubuntu 22.04/24.04.
1. Prerequistes #
sudo apt update
sudo apt install -y debootstrap uidmap util-linux git

# Optional: networking helpers for rootless
sudo apt install -y slirp4netns iproute2 iptables
- debootstrap — builds a tiny Ubuntu/Debian rootfs.
- uidmap — provides newuidmap/newgidmap setuid helpers for user namespaces.
- util-linux — provides unshare, nsenter, etc.
- slirp4netns — user‑mode networking for rootless containers
2. Build a minimal root file system (rootfs) #
Detect host architecture
uname -m
# x86_64 → use amd64 + archive.ubuntu.com
# aarch64 → use arm64 + ports.ubuntu.com
Create the rootfs directory
mkdir -p ~/containers/rootfs
Bootstrap (choose one)
x86_64 hosts (amd64):
sudo debootstrap --arch=amd64 jammy ~/containers/rootfs http://archive.ubuntu.com/ubuntu/
ARM64 hosts (aarch64):
sudo debootstrap --arch=arm64 jammy ~/containers/rootfs http://ports.ubuntu.com/ubuntu-ports
Note: If you hit GPG errors, try sudo apt install ubuntu-keyring or temporarily add –no-check-gpg (not recommended for production).
Sanity check
ls ~/containers/rootfs/bin/bash
file ~/containers/rootfs/bin/bash # Should say amd64 (x86-64) or aarch64 (ARM64) to match your host
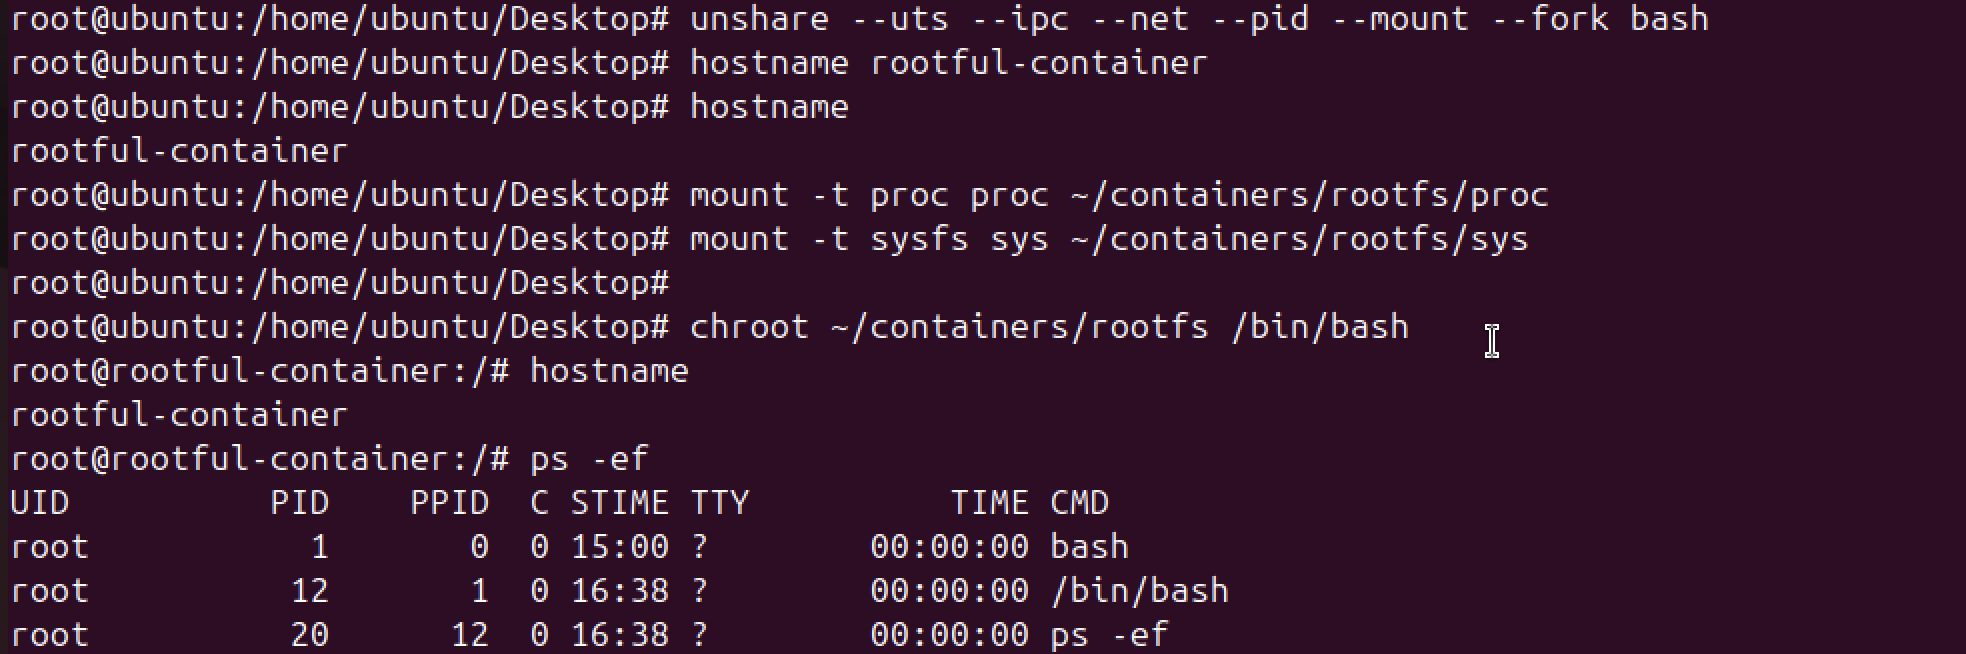
3. Rootful container (unshare + chroot) #
Lets create new namespaces, mount /proc for this PID namespace, and chroot to the rootfs.
# 1) Create isolated namespaces (host → new shell in new namespaces)
sudo unshare --uts --ipc --net --pid --mount --fork bash


# 2) (Inside the new shell) give it a hostname for clarity
hostname rootful-container


# 3) (Inside the new shell) Mount proc and some basics into the future container rootfs
mount -t proc proc ~/containers/rootfs/proc
mount -t sysfs sys ~/containers/rootfs/sys
mount --rbind /dev ~/containers/rootfs/dev (optional)
mount --make-rslave ~/containers/rootfs/dev (optional - if the above --rbind is ran)


# 4) (From Host) Enter the container filesystem
chroot ~/containers/rootfs /bin/bash


# 5) (Inside container) verify isolation
ps -ef # only a few processes; your shell is PID 1
hostname # rootful-container
ip link # network namespace is empty by default
Why mount /proc? Tools like ps/top read /proc. Without a fresh /proc inside the new PID namespace, you’ll see errors like fatal library error, lookup self.
Commands explained:
mount -t proc proc ~/containers/rootfs/proc
- mount
The Linux command used to attach a filesystem to a specific directory.
- -t proc
Specifies the type of filesystem to mount. In this case, proc is a special type — a virtual FS used to expose process and kernel information.
- proc
This is the device or source being mounted. Since proc isn’t a real disk, the keyword “proc” is used here as a placeholder.
- ~/containers/rootfs/proc
This is the target mount point — where the proc filesystem will appear. You’re attaching /proc inside the container’s root filesystem.
mount -t sysfs sys ~/containers/rootfs/sys
sysfs is a virtual filesystem provided by the Linux kernel that exposes information about:
- Devices (/sys/class, /sys/block)
- Kernel subsystems
- Hardware configuration (e.g., CPU, memory, power management)
- Kernel tunables (via sysfs knobs)
It’s mounted at /sys on most Linux systems, and is used by both system utilities and programs to read and modify hardware-level configuration safely and in user space.
Tools like lsblk , lscpu depends on /sys
mount --rbind /dev ~/containers/rootfs/dev
Command recursively bind-mounts the entire /dev directory (basic device files) from the host into the container’s root filesystem — at ~/containers/rootfs/dev
mount --make-rslave ~/containers/rootfs/dev
Command changes the mount propagation type of the mount point ~/containers/rootfs/dev to “rslave”
rslave propogration type - “Propagate mounts/unmounts recursively from the host to this container, but NOT the other way around.” - Any changes in /dev will be done from host to container, and changes from container to /dev will not be permitted.
Exit & cleanup:
exit # leave chroot
umount -R ~/containers/rootfs/proc ~/containers/rootfs/sys || true
exit # leave the unshared shell
Single command to launch a rootful container:
sudo unshare --uts --ipc --net --pid --mount --fork \
    bash -c 'hostname mycontainer; \
    mount -t proc proc ~/containers/rootfs/proc; \
    mount -t sysfs sys ~/containers/rootfs/sys; \
    mount --rbind /dev ~/containers/rootfs/dev; \
    mount --make-rslave ~/containers/rootfs/dev; \
    chroot ~/containers/rootfs /bin/bash'
4. Resource limits with cgroups v2 (rootful) #
Create a cgroup and move the container’s PID into it.
Before we create a cgroup we will need a long-live container to ensure that the process does not exit, which would destroy the namespace. Hence by running /bin/sleep infinity, we keep the namespace alive.
sudo unshare --uts --ipc --net --pid --mount --fork \
chroot ~/containers/rootfs /bin/sleep infinity &
CONTPID=$!; echo "container host PID: $CONTPID"


Create a cgroup and limit CPU to ~50%:
sudo mkdir -p /sys/fs/cgroup/rootful-container
echo $CONTPID | sudo tee /sys/fs/cgroup/rootful-container/cgroup.procs
# cpu.max takes: <quota> <period>; 50ms quota per 100ms period ~ 50%
echo "50000 100000" | sudo tee /sys/fs/cgroup/rootful-container/cpu.max
Memory cap example (200 MiB hard limit):
echo $((200*1024*1024)) | sudo tee /sys/fs/cgroup/rootful-container/memory.max
Cgroup files of rootful-container

5. Enter (exec into) a running container #
Now that we have a running container lets exec into it and check the container process.
Find PIDs and namespaces
ps -ef | grep chroot # find the chroot/sleep/bash you started
ls -l /proc/<pid>/ns # see namespace inodes for pid, mnt, net, uts, ipc, user
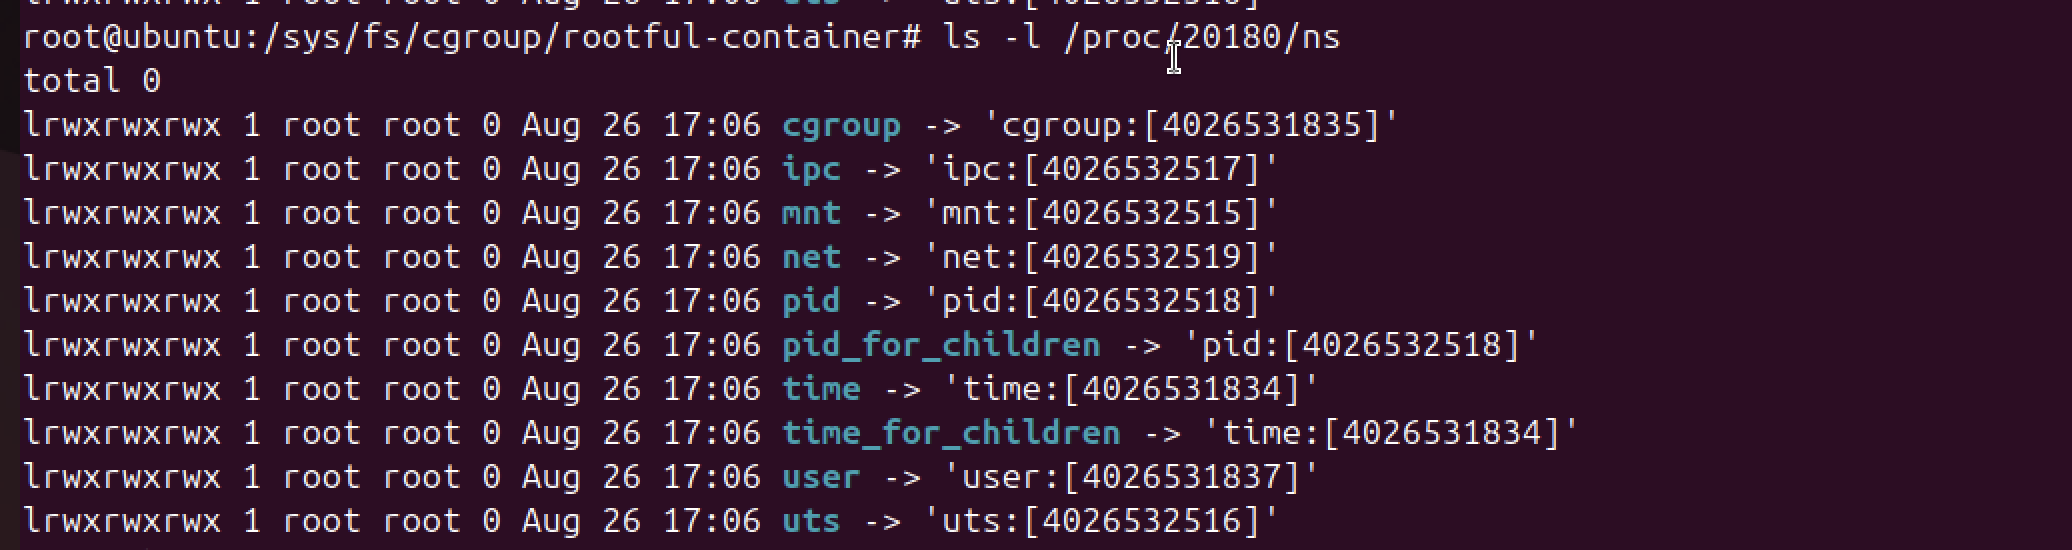
To confirm that the host and container are sharing different namespace.
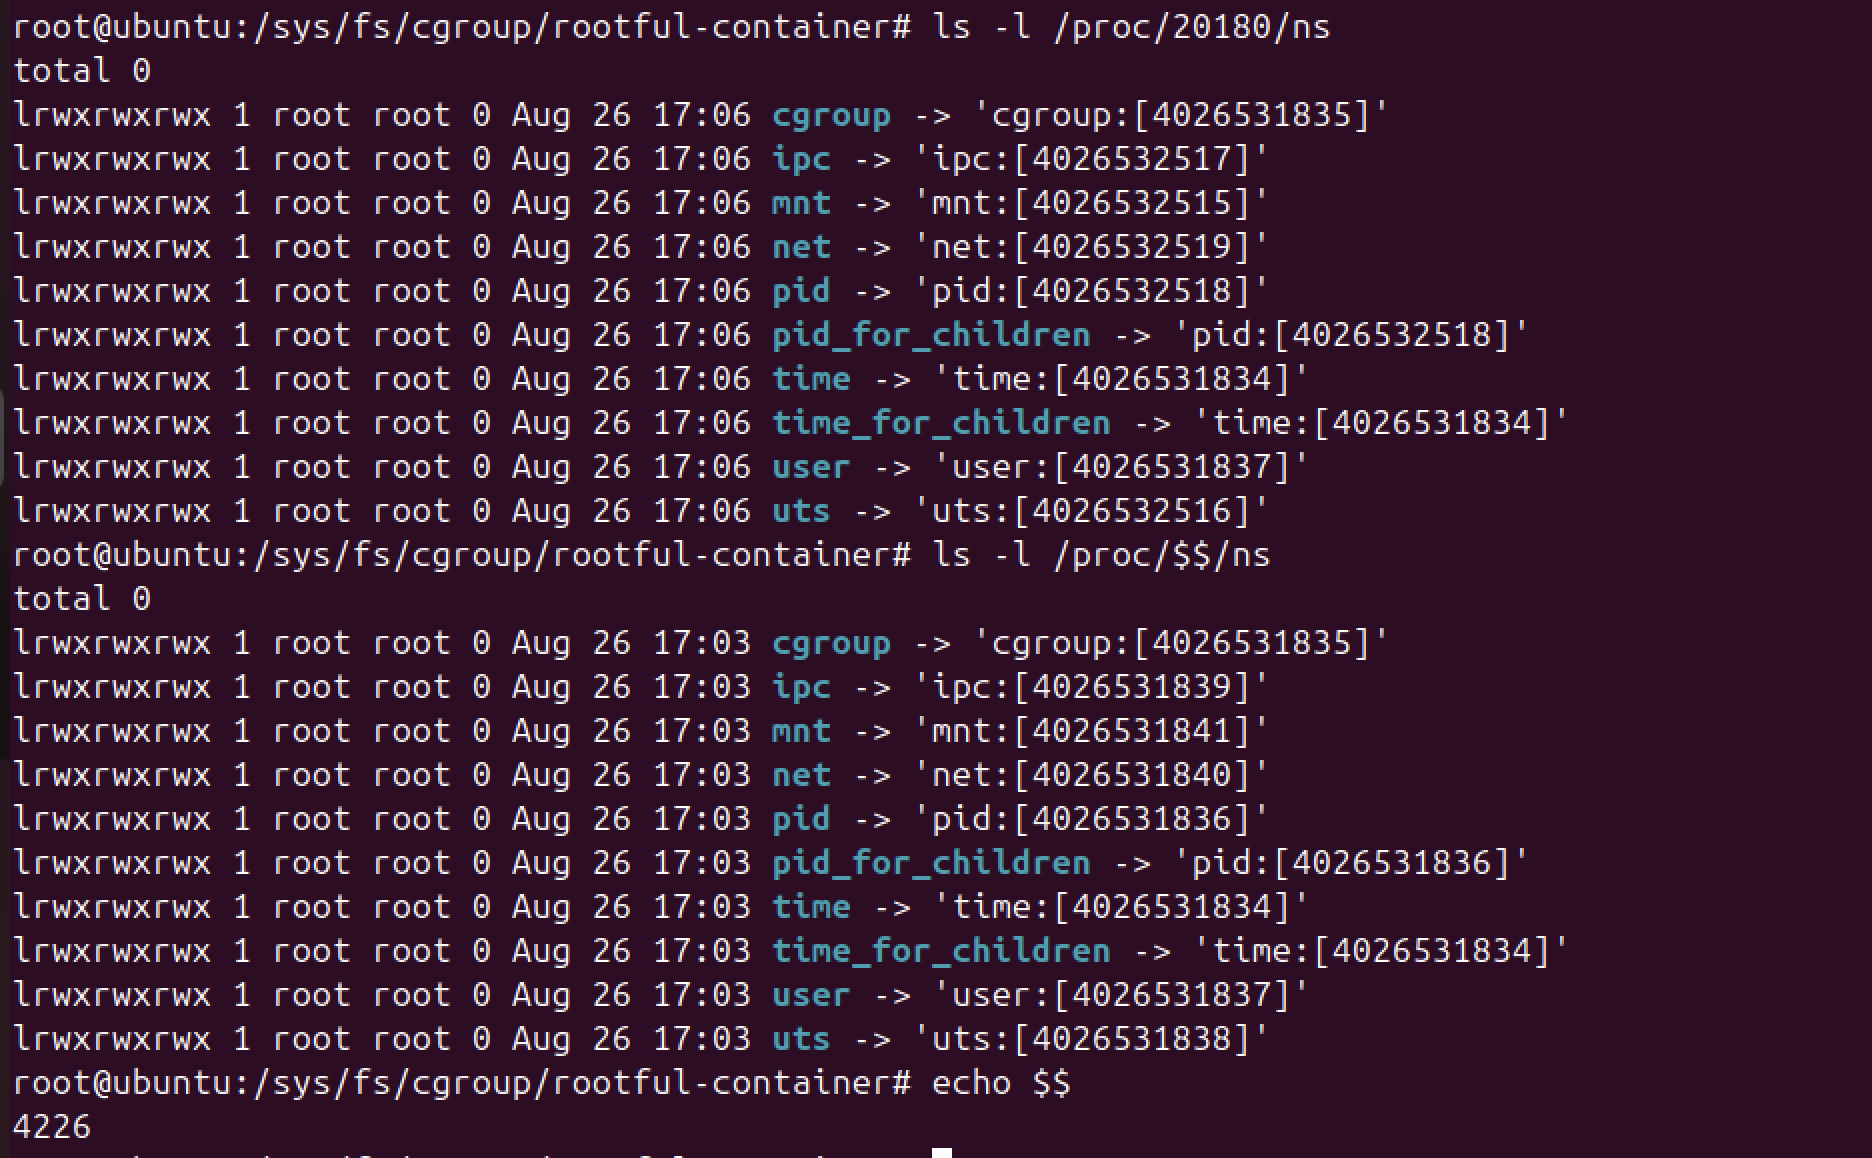
As you can see in the above screenshot the inode numbers of the namespace objects are different, this tells us that the two process (host and container) are in isolated namespace.
Exec into the container:
sudo nsenter --target <pid> --uts --ipc --net --pid --mount /bin/bash

6. Rootless Containers (user namespaces) #
In rootless containers - UID 0 inside ≠ UID 0 outside. “Root” in the container maps to your unprivileged host UID/GID.
Check subordinate ID ranges
sudo apt install -y uidmap
cat /etc/subuid
cat /etc/subgid

This grants your user 65k UIDs/GIDs for mappings.
Start a user namespace shell
unshare --user --mount --pid --fork --mount-proc sleep infinity &
# Note : run unshare without sudo.
To run unshare in user space without sudo
You will need to disable AppArmor / sysctl restriction
cat /proc/sys/kernel/apparmor_restrict_unprivileged_userns
If it exists and is 1, then the AppArmor is blocking. To temporarily allow it runt the below command.
sudo sysctl -w kernel.apparmor_restrict_unprivileged_userns=0
Get the pid of the above process started in user space
ps -ef | grep sleep
Run the following commands to map non root user inside container as root
# “do not allow this namespace to call setgroups()
echo deny | sudo tee /proc/<pid>/setgroups

# sets up a UID mapping for the namespace process with PID
# 0 = UID inside the namespace (the “root”).
# 1000 = your real user (ubuntu) on the host.
# 1 = only one UID is mapped.

echo "0 1000 1" | sudo tee /proc/<pid>/uid_map

# sets up a GID mapping for the namespace process with host GID
echo "0 1000 1" | sudo tee /proc/<pid>/gid_map
By running the above set of commands.
- UID 0 in the namespace ↔ UID 1000 (ubuntu)
- Maps namespace GID 0 (root in container) → host GID 1000 (ubuntu’s group).
- Inside the namespace, you look like root (uid 0).
- Outside, anything you create is owned by ubuntu, not real root.
File ownership in container is root
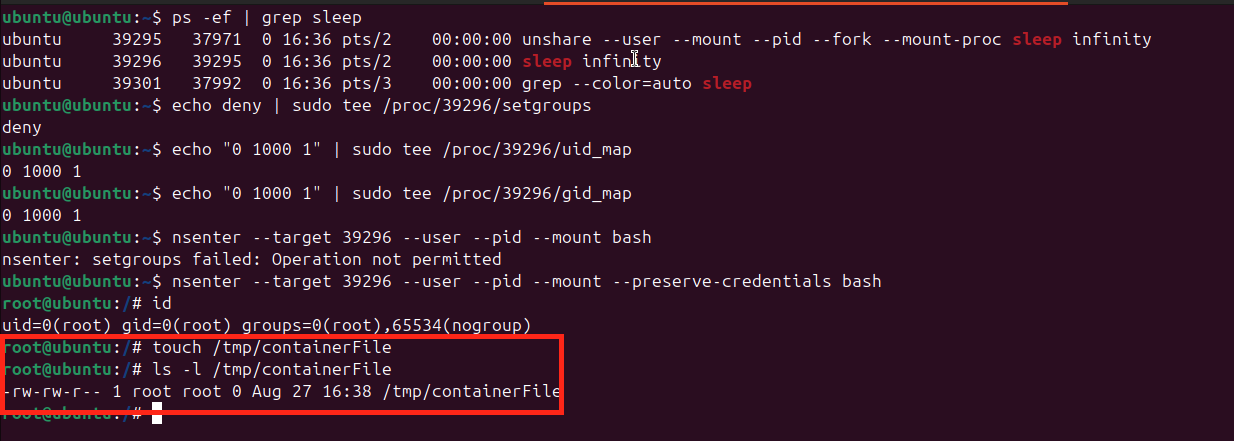
File ownership in host is still ubuntu
