
Introduction : #
Elastic File System is a network file system (NFS) offered by AWS. Its one of the storage services offered by aws which can be used with aws native services and in the on-premises resources. Its built to scale, on demand and gives you the flexibility to manage the storage based on your application needs.
AWS Fargate is a serverless compute engine mainly for container based workloads. So the main principle behind this service is maintain less , develop more . It works with both AWS ECS and AWS EKS.
Well this blog is not to explain about efs , fargate or its benefits, so let me cut down the intro and jump on to the major break through what aws gave us.
Back in the days #
Before going to the pros and setup part of it , lets understand why this is important.
We know aws fargate is serverless , so this means only stateless application can be deployed onto fargate. Lets say you have a requirement to store some data for your application needs , in that case you can’t have a persistant storage attached to your computes because you dont control your computes.
This is where EFS fits in. So for those applications for which you don’t have control over volumes you can mount file systems and save your data.
Container Orchestration: #
So those who use Elastic Container Orchestration Service (ECS) / Elastic Kubernetes Service (EKS) know there are two ways to bring up your cluster:
Managed computes (a.k.a EC2) Fargate computes In this blog I will talk with respect to the setup made for ECS service and will soon post a blog on setup for EKS as well.
Implementaion #
- EFS File system:
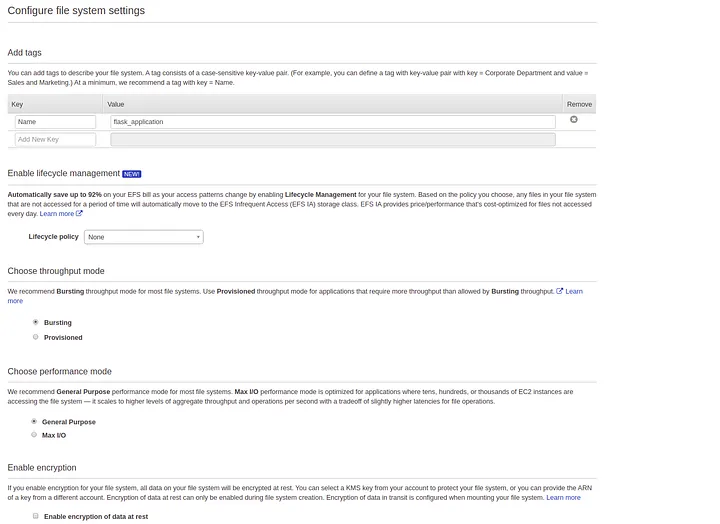
- Choose the VPC and Subnets in which you want to create the file system.
- Rest other options I will leave to the engineers needs.
- Configure client access policy
{
    "Version": "2012-10-17",
    "Id": "efs-policy-wizard-b6e2c73a-bdae-4f6b-b3a3-34aac66fcc6d",
    "Statement": [
        {
            "Sid": "efs-statement-2003b47b-0c69-4117-b343-b88e01b84529",
            "Effect": "Deny",
            "Principal": {
                "AWS": "*"
            },
            "Action": "*",
            "Condition": {
                "Bool": {
                    "aws:SecureTransport": "false"
                }
            }
        },
        {
            "Sid": "efs-statement-581e7803-c107-4681-811f-59f8632b5652",
            "Effect": "Allow",
            "Principal": {
                "AWS": "*"
            },
            "Action": [
                "elasticfilesystem:ClientMount"
            ]
        }
    ]
}
This policy will ensure the following:
- Disabling root access
- Read only access for your file system
- Encryption in transit for all clients.
NOTE : The IAM policy for users can override these permissions.
- Creating an Access Point:
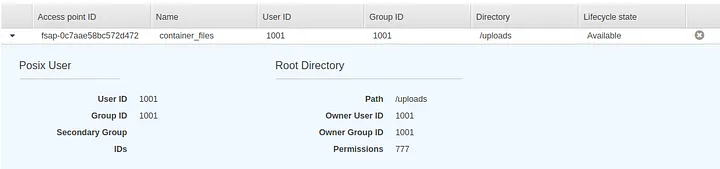
Access point is a mandatory requirement for you to use EFS in fargate.
Make sure you configure right POSIX user-id , group-id , root directory and permission for your file system.
Now that we are ready with our EFS lets go ahead and setup fargate cluster…
Elastic Container Orchestration (a.k.a ECS) #
We have two ways to bring up a cluster on ECS.
- EC2 Linux/Windows
- Networking only — powered by AWS Fargate.
- Select option 2 and create your cluster in a VPC.
- Create Task Definition for your service.
- I am using ECR as my image repository for this setup.
- In the task definition template this is my container definitions and volumes.
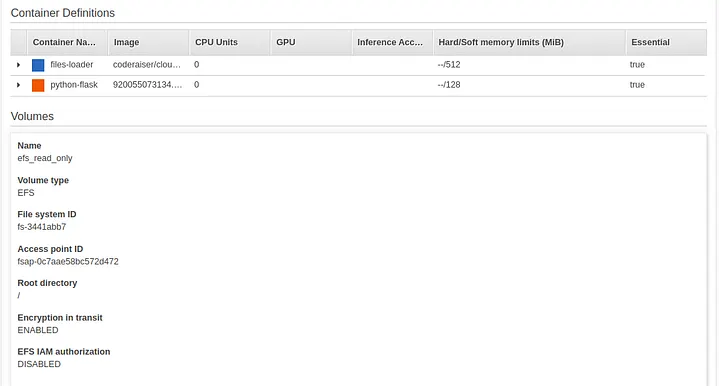

I am mounting the efs_read_only volume created in the above setup to /tmp which is inside the container.
I am running two containers:
- Python Flask Application — Which consumes the data stored in the filesystem.
- File Loader — To see all the files on the server for our reference.
Note: I am creating a volume based from my efs creation and referring those values here. File system id and access point id are taken from my efs configuration.
- Once task definition is created I will go ahead and create service using the task definition.
- During the service creation I create a new security group which allows 80 and 8000 ports . 80 for my flask application and 8000 for my file loader.
- Upon creation of service wait for it to get provisioned.
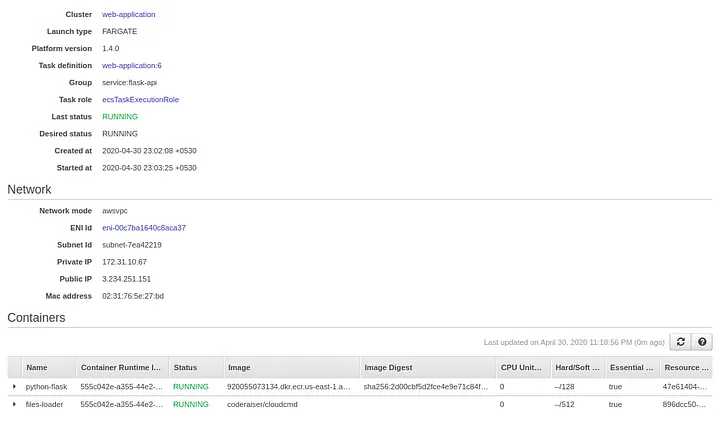

Now my both services are active and available on port 80 and 8000.
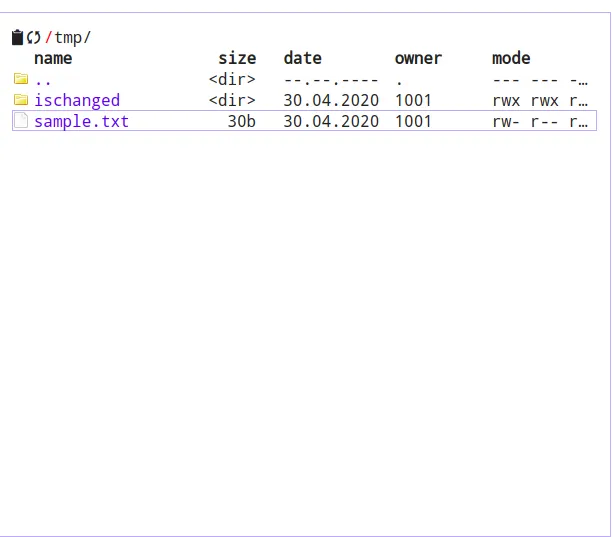
As you can see I have uploaded a file called sample.txt which is in /tmp location , where my efs file system is mounted. Check out the POSIX user-id it is 1001 which was configured for the access point of efs file system.
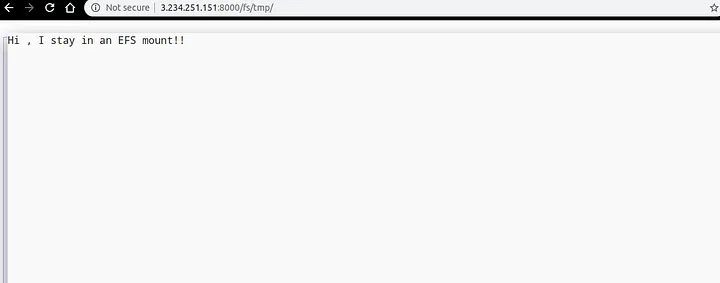
Above is the content of the file which is opened from file loader which is running on port 8000.
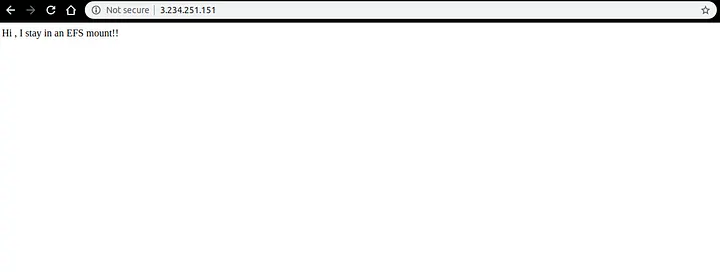
Referring back to our container definition for python-flask the container volume /tmp is pointing to the efs_read_only which is nothing but the access point location of the efs file system.
The python application is running on port 80 , lets verify if its fetching the data from the file system.
Sample Python code:
import flask
app = flask.Flask(__name__)
app.config["DEBUG"] = True
@app.route('/', methods=['GET'])
def home():
    f = open("/tmp/sample.txt","r")
    return f.read()
app.run(host="0.0.0.0",port=80)
DockerFile used to build the image:
FROM python:3.7.3-stretch
# Working Directory
WORKDIR /app
# Copy source code to working directory
COPY hello.py /app/
COPY requirements.txt /app/
# Install packages from requirements.txt
# hadolint ignore=DL3013
RUN pip install --upgrade pip &&\
    pip install --trusted-host pypi.python.org -r requirements.txt
# Expose port 80
EXPOSE 80
# Run app.py at container launch
CMD ["python", "hello.py"]
requirement.txt
pylint
flask
Check out the github page for — File Loader .
Conclusion #
So the data is persisted in the file system mounted on the compute and we are able to successfully fetch the contents through our application.